

The Ultimate Guide to Hiking Angels Landing in Zion National Park: Permits, Safety, and My Personal Experience
After completing the Angels Landing hike three times over the past five years, I can confidently say this is one of the most thrilling and rewarding adventures you'll find in any national park. This comprehensive guide covers everything you need to know about conquering Zion National Park Angels Landing, from securing permits to navigating the famous chains section safely. Whether you're a first-time visitor or returning hiker, this guide will help you make the most of this iconic experience.
My Personal Experience with Angels Landing
I'll never forget my first time approaching the famous chains section of Zion National Park Angels Landing. My heart was pounding not just from the 1,488-foot elevation gain I'd already conquered, but from the sheer adrenaline of what lay ahead. As someone who had hiked extensively throughout Utah's national parks, I thought I was prepared for anything – but Angels Landing proved to be in a league of its own.
The hike began at 6:30 AM from the Grotto trailhead, and I was immediately struck by how well-maintained the initial portion of the trail was. The West Rim Trail that leads to Angels Landing starts deceptively easy, following the Virgin River through relatively flat terrain. However, I quickly learned that this gentle introduction was just the calm before the storm. After crossing the bridge and walking for about a mile, the real adventure began as the trail started its relentless climb toward Scout Lookout. For those interested in exploring other challenging trails, ***Acadia National Park climbing adventures*** offer similar thrills with different scenery.

What surprised me most about the Zion National Park Angels Landing experience was how the difficulty gradually ramps up. The infamous Walter's Wiggles – a series of 21 steep switchbacks carved into the rock face – tested my endurance but rewarded me with increasingly spectacular views of Zion Canyon. Each switchback revealed another layer of the canyon's beauty, from the towering red sandstone cliffs to the lush vegetation below. By the time I reached Scout Lookout, I felt like I had already accomplished something remarkable, even though the most challenging section still lay ahead.
The final half-mile to the Angels Landing summit is where this hike earns its reputation as one of America's most thrilling adventures. The chains section requires both physical strength and mental fortitude. I remember gripping those heavy-duty chains, feeling the solid rock beneath my feet, and taking one careful step at a time along the narrow ridge. The exposure is real – with drop-offs of over 1,000 feet on both sides – but the engineering of the trail and the security of the chains made me feel confident in the safety measures that have been put in place. If you're planning similar adventures on the East Coast, check out **mountains in Acadia National Park** for equally rewarding but less technical hiking options.
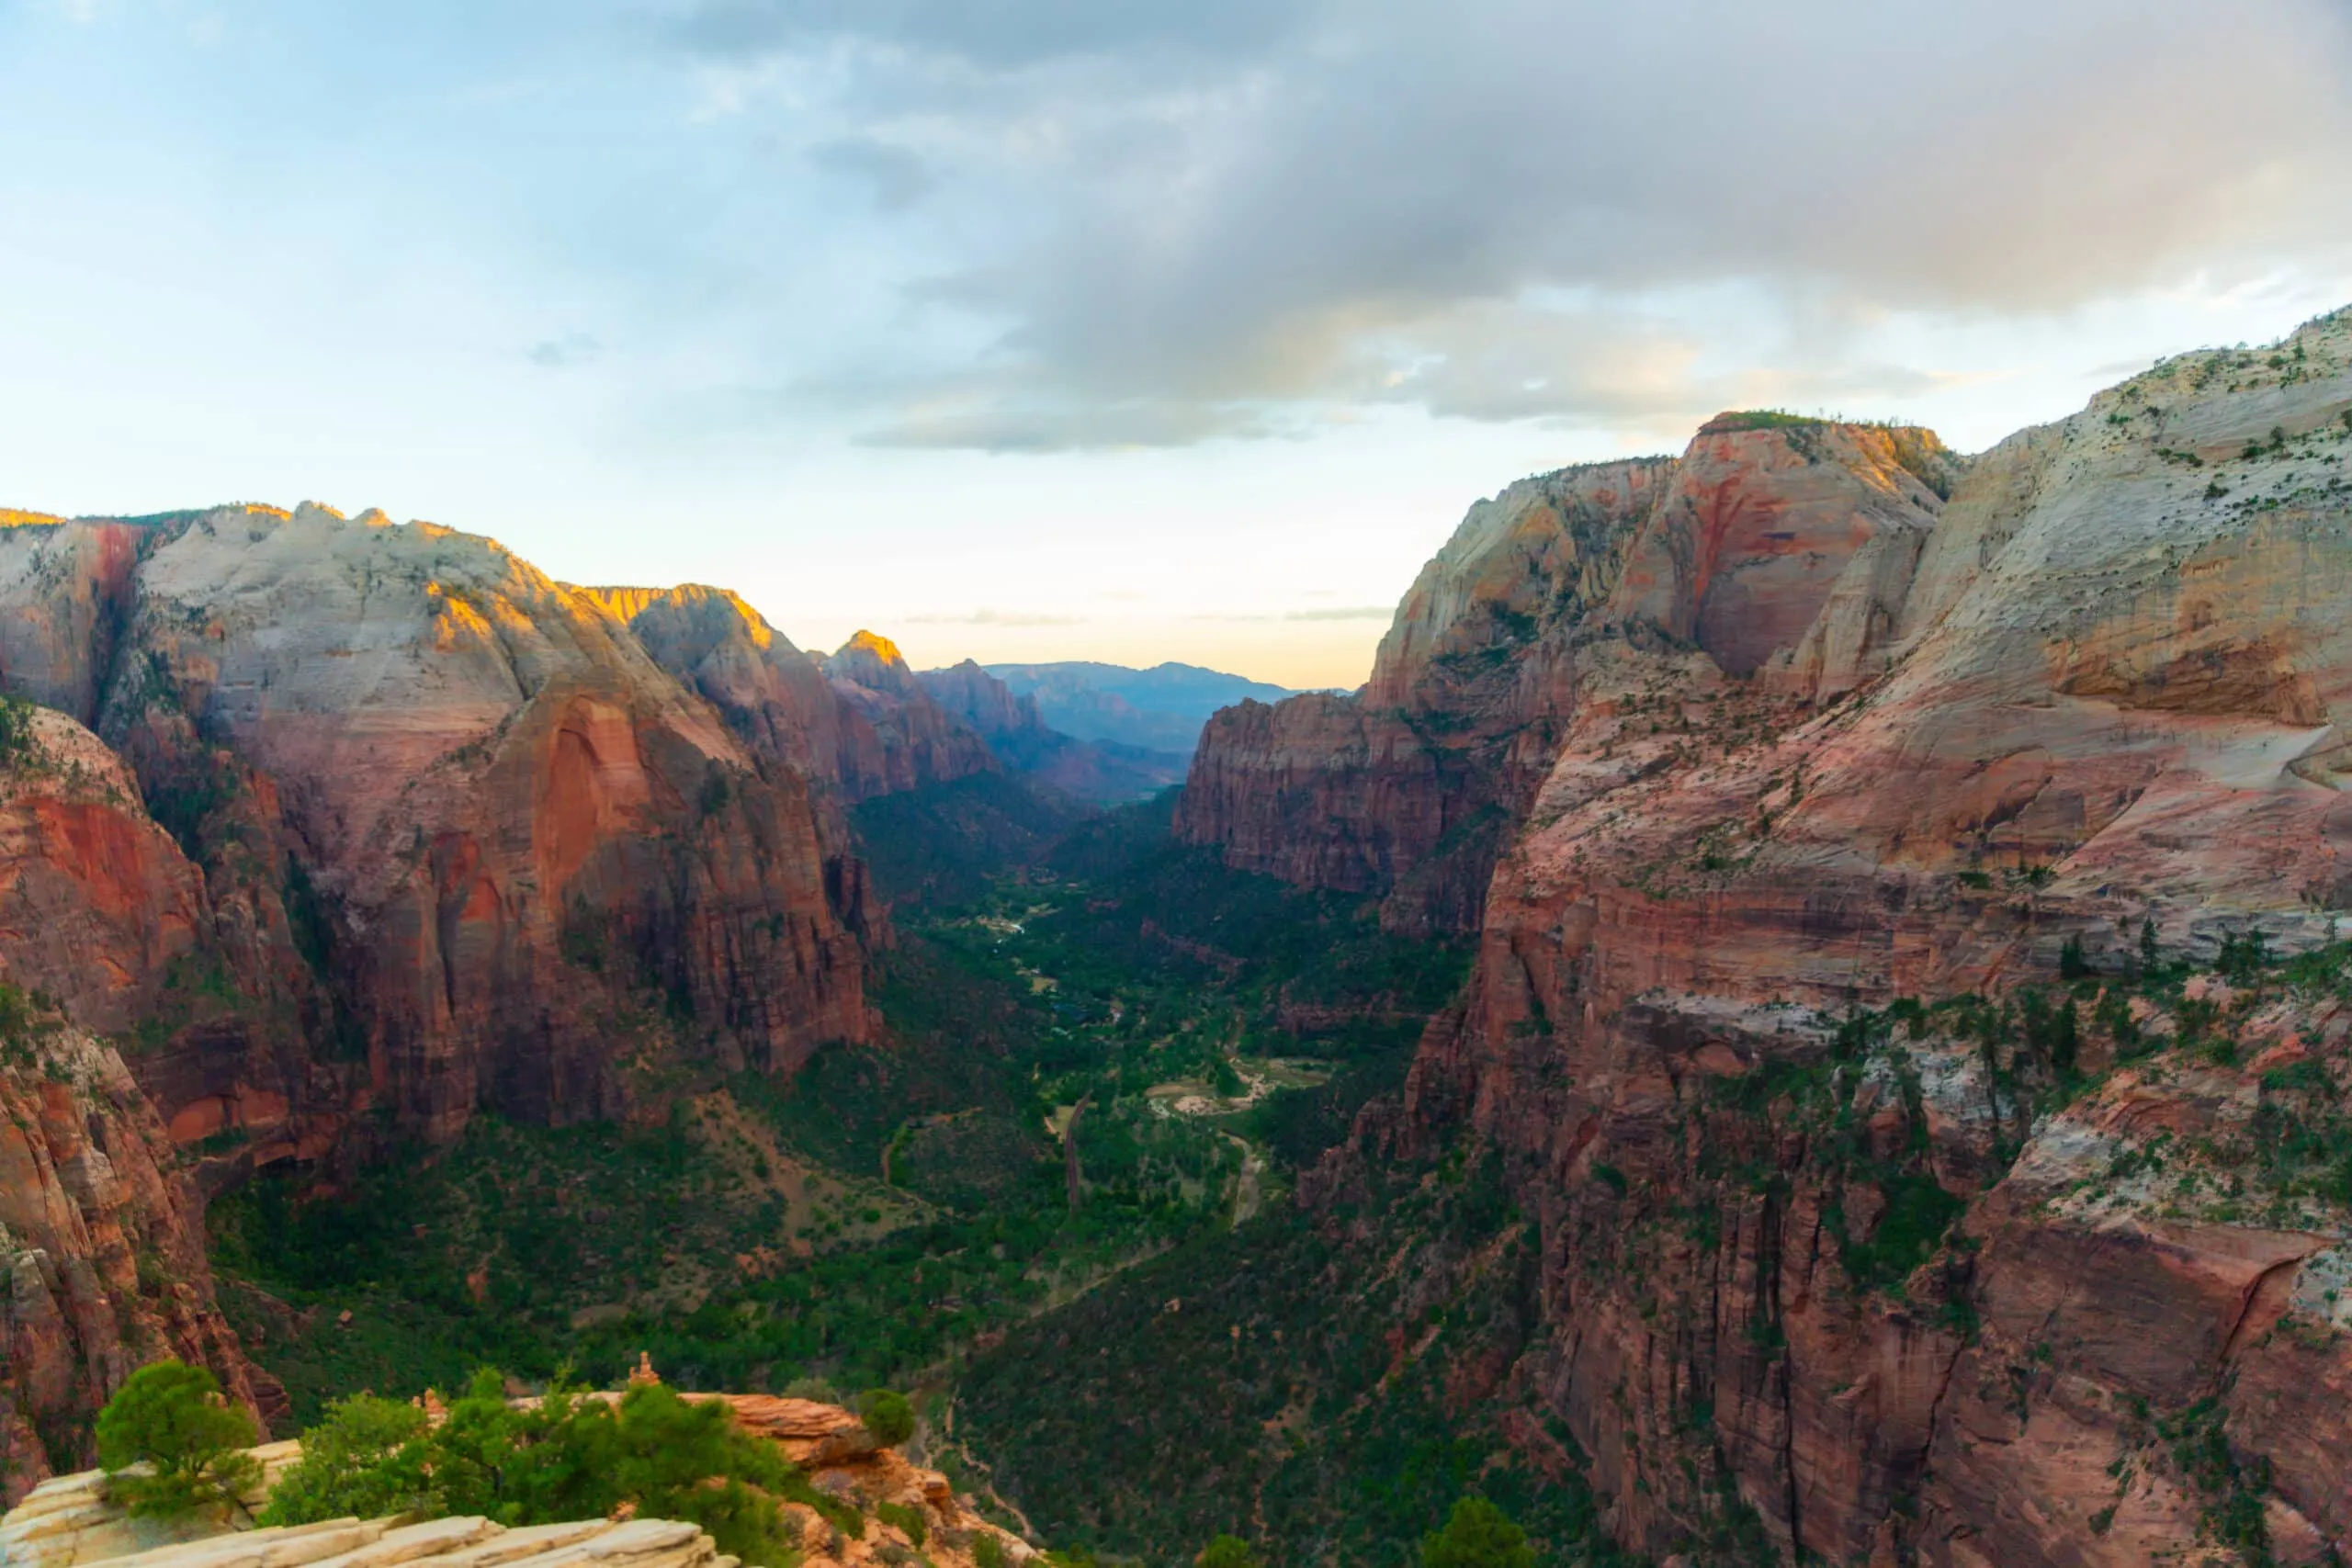
Standing on the summit of Angels Landing, looking out over the vastness of Zion Canyon, I understood why this hike has become legendary. The 360-degree panoramic views encompass the entire Zion National Park Angels Landing area, from the Great White Throne to the Temple of Sinawava. It's a perspective that simply cannot be captured in photographs – you have to experience it yourself to truly appreciate the magnitude and beauty of this natural wonder.
Get Your Professional Climbing Shoes for Angels Landing →
Essential Permit Information and How to Secure Yours
Since April 2022, hiking beyond Scout Lookout to the summit of Angels Landing requires a permit – a change that has significantly improved the hiking experience by reducing dangerous overcrowding on the chains section. Based on my experience navigating this system multiple times, I can provide you with insider tips on how to successfully secure your Zion National Park Angels Landing permit.
The permit system operates through two main channels: seasonal lotteries and day-before lotteries, both managed through Recreation.gov. For the seasonal lottery, applications open at 8:00 AM Mountain Time and close at 11:59 PM on the following dates: January 1-20 for spring hikes (March 1 - May 31), April 1-20 for summer hikes (June 1 - August 31), July 1-20 for fall hikes (September 1 - November 30), and October 1-20 for winter hikes (December 1 - February 29).
Understanding the Lottery System
The lottery uses a ranked-choice system, which means you can select up to seven preferred dates and times, ranking them in order of preference. From my experience, I recommend listing your most desired dates first, but also including some less popular options (like weekday mornings) to increase your chances. The system costs $6 per application (non-refundable) plus $3 per person if you're awarded a permit.
For those who didn't secure a seasonal permit, the day-before lottery opens at midnight and closes at 3:00 PM the day before your desired hike. You'll be notified by 4:00 PM whether you've been selected. I've successfully used this system twice when my seasonal applications weren't selected, and while it requires flexibility in your travel plans, it's an excellent backup option for visiting Zion National Park Angels Landing. For those traveling from the Northeast, you might also enjoy planning a trip to experience ***the journey from NYC to Acadia National Park*** for a different but equally rewarding outdoor adventure.
.webp)
Important permit details to remember: each permit covers up to six people, you must print or download your permit confirmation email before hiking, rangers conduct random permit checks throughout the trail, and permits are strictly non-transferable. I always save a screenshot of my permit to my phone since cell service in Zion Canyon can be spotty. Hiking Angels Landing without a permit is a federal offense punishable by fines up to $5,000 and up to six months in jail – a risk definitely not worth taking.
One crucial point that many visitors overlook: you don't need a permit to hike to Scout Lookout, which offers spectacular views of Zion Canyon and represents about 90% of the Angels Landing experience. If you can't secure a permit for the final chains section, Scout Lookout is still absolutely worth the 2.5-mile hike and provides incredible photo opportunities of the Zion National Park Angels Landing area.
Complete Step-by-Step Trail Guide
The Angels Landing trail is a 5.4-mile round-trip journey that takes most hikers 4-6 hours to complete. Having hiked this trail in different seasons and conditions, I can provide detailed guidance for each section to help you navigate confidently through your Zion National Park Angels Landing adventure.
Section 1: Grotto Trailhead to Refrigerator Canyon (Mile 0-1.2)
Your journey begins at the Grotto shuttle stop (Stop #6), where you'll find restrooms and water fountains – take advantage of both before starting. The trail immediately crosses a bridge over the Virgin River, offering your first glimpse of the towering canyon walls that define this landscape. This initial section follows the West Rim Trail and remains relatively flat as it winds through the canyon floor.
The paved trail gradually gains elevation as you approach Refrigerator Canyon, aptly named for its cool, shaded environment. Even on hot summer days, this narrow slot canyon provides welcome relief from the desert sun. I always take a few minutes here to appreciate the unique microclimate, where you'll notice different vegetation thriving in the cooler, moister conditions. The towering walls create natural air conditioning that makes this section particularly enjoyable. Don't forget to pack a reliable **lightweight hiking backpack** for carrying your essential gear through these varied terrain sections.
Section 2: Walter's Wiggles (Mile 1.2-1.8)
Exiting Refrigerator Canyon, you'll encounter the famous Walter's Wiggles – 21 steep switchbacks that represent the most cardio-intensive portion of the hike. Named after Walter Ruesch, Zion's first superintendent who designed these ingenious switchbacks in 1926, this section gains significant elevation in a short distance. The engineering is remarkable, with each switchback carefully carved into the rock face to provide the safest possible route up the steep canyon wall.
During my hikes, I've learned to pace myself through Walter's Wiggles by taking brief rest stops every 5-7 switchbacks. The views become increasingly spectacular as you climb higher, providing natural motivation to continue. Don't rush this section – the steady, consistent pace will serve you better than trying to power through quickly. Each switchback offers a slightly different perspective of the Zion National Park Angels Landing area, making the climb as rewarding as the destination.
Section 3: Scout Lookout (Mile 1.8-2.2)
After conquering Walter's Wiggles, you'll arrive at Scout Lookout, a wide, sandy plateau that serves as the staging area for the final assault on Angels Landing. This is where permits are typically checked, and it's your last chance to use restroom facilities (pit toilets are available here). The views from Scout Lookout are already incredible, encompassing most of Zion Canyon and providing a preview of what awaits at the summit.
I always recommend taking 10-15 minutes at Scout Lookout to rest, hydrate, and mentally prepare for the chains section. This is also where many hikers decide whether to continue – and there's no shame in choosing Scout Lookout as your endpoint. The views here are magnificent, and you'll have conquered the majority of the Zion National Park Angels Landing trail. For those continuing, this is where the real adventure begins. Make sure you have proper ***hydration gear*** for the technical sections ahead.
Section 4: The Chains Section to Angels Landing Summit (Mile 2.2-2.7)
The final half-mile to the Angels Landing summit is unlike anything else in the national park system. The trail follows a narrow ridge with steep drop-offs on both sides, requiring the use of heavy chains anchored into the rock for support. This section demands complete focus and respect for the exposure, but the engineering and safety measures make it manageable for anyone with reasonable fitness and no severe fear of heights.
I approach the chains section with a methodical mindset: always maintain three points of contact (two hands and one foot, or two feet and one hand), move deliberately rather than rushing, and communicate clearly with other hikers about passing. The chains are positioned strategically where they're most needed, and there are several sections where you can rest on wider portions of the ridge. The key is maintaining steady progress while staying alert and focused on each step. Having quality **climbing gloves for grip** makes this section significantly safer and more comfortable.

Safety Tips and What to Expect
Safety should be your top priority when hiking Angels Landing, and my multiple experiences on this trail have taught me valuable lessons about managing risks effectively. While the Zion National Park Angels Landing hike has an excellent safety record when proper precautions are taken, the exposure and technical nature of the chains section require serious preparation and respect.
Weather conditions play a crucial role in safety on Angels Landing. I've learned to never attempt the chains section during or after rain, as wet sandstone becomes extremely slippery and dangerous. Similarly, high winds make the exposed ridge sections hazardous, and lightning poses a serious threat to hikers on the metal chains. I always check the weather forecast carefully and am prepared to turn back if conditions deteriorate during the hike.
Physical fitness and mental preparation are equally important for a safe Angels Landing experience. The 1,488-foot elevation gain and technical nature of the final section require good cardiovascular fitness and comfortable experience with exposure. I recommend training with hikes that include significant elevation gain and practicing balance and stability exercises before attempting Zion National Park Angels Landing. For those seeking additional outdoor adventures to build skills, consider **horseback riding in Acadia National Park** as a way to develop balance and outdoor confidence.
Proper footwear cannot be overstated in importance – I always wear hiking boots with excellent traction and ankle support. The rock can be slippery even in dry conditions, and the consequences of a slip are severe. I've also learned to bring work gloves or climbing gloves to improve grip on the chains and protect my hands from the rough metal and rock surfaces.
Crowd management is another significant safety consideration, especially during peak hiking seasons. The chains section can become congested, requiring patience and clear communication with other hikers about passing safely. I've found that starting early (before 7:00 AM) dramatically reduces crowds and creates a safer, more enjoyable experience on the trail. Always carry a comprehensive ***first aid kit*** for emergencies on remote trails like this.
Best Time to Hike Angels Landing
Timing your Zion National Park Angels Landing hike correctly can make the difference between a challenging but rewarding experience and a miserable ordeal. Having hiked this trail in various seasons and weather conditions, I can provide specific guidance on when to plan your adventure for optimal conditions.
Spring (March through May) represents the ideal season for hiking Angels Landing, offering moderate temperatures, longer daylight hours, and generally stable weather conditions. During my spring hikes, daytime temperatures typically range from 60-80°F, perfect for the strenuous climb. Spring also coincides with wildflower blooms in the lower elevations, adding visual interest to the early portions of the trail. However, spring is peak season, so expect more crowds and higher permit competition.
Fall (September through November) provides my second-favorite time for the Angels Landing adventure. The temperatures cool down from summer's extreme heat, typically ranging from 50-75°F, and the autumn light creates spectacular photography conditions in Zion Canyon. Fall colors aren't dramatic in the desert landscape, but the quality of light during this season enhances the red rock formations beautifully. Crowds begin to thin out after Labor Day, making permit acquisition slightly easier.
Summer hiking on Zion National Park Angels Landing requires careful planning and early starts to avoid dangerous heat exposure. I've completed summer hikes by starting before sunrise (5:30 AM) and finishing before 11:00 AM to avoid the most intense heat. Temperatures can exceed 100°F by midday, and the exposed nature of much of the trail offers little shade. If you hike in summer, bring significantly more water than you think you'll need and consider electrolyte supplements.
Winter hiking presents unique challenges but can offer a remarkably peaceful Angels Landing experience. I've hiked in winter when snow and ice make the chains section extremely dangerous – conditions that should absolutely be avoided. However, clear winter days with dry conditions can provide solitude and crystal-clear views that are impossible to find during peak season. Winter temperatures range from 20-50°F, requiring appropriate cold-weather gear.
Regardless of season, I always recommend starting your hike as early as possible. Beginning at sunrise not only helps you avoid crowds but also provides better lighting conditions for photography and reduces your exposure to extreme temperatures. The early morning light on the red sandstone formations of Zion National Park Angels Landing area creates some of the most stunning natural lighting you'll ever experience. For comprehensive outdoor adventure planning, visit **Wilderness Paths** for additional resources and guides.
What to Bring and Preparation Tips
Proper preparation and equipment selection can determine the success and safety of your Zion National Park Angels Landing adventure. Through trial and error over multiple hikes, I've refined my gear list and preparation routine to optimize both safety and enjoyment on this challenging trail.
Water requirements for Angels Landing exceed those of most day hikes due to the strenuous nature of the climb and exposure to sun and wind. I typically carry 3-4 liters of water per person during moderate weather conditions, increasing to 4-5 liters during hot summer months. The dehydrating effects of high elevation and physical exertion are compounded by the dry desert air, making hydration absolutely critical for both performance and safety.
Footwear selection deserves special attention for the Angels Landing hike. I exclusively wear hiking boots with aggressive tread patterns and excellent ankle support. The Navajo sandstone that comprises most of the trail can be surprisingly slippery, especially on steep sections and the polished areas near the chains. Boots with sticky rubber compounds designed for rock climbing provide superior traction on the technical sections of Zion National Park Angels Landing.
My essential gear checklist includes: high-quality hiking boots, work gloves or climbing gloves for the chains section, sun hat and sunglasses, high-SPF sunscreen, first aid kit with blister treatment, headlamp or flashlight with extra batteries, emergency whistle, and a lightweight rain jacket for weather protection. I also always carry a paper map of the trail as backup navigation, even though the route is well-marked.
Food planning for Angels Landing should focus on high-energy, easy-to-consume options that won't weigh you down. I prefer energy bars, trail mix, dried fruit, and electrolyte supplements rather than heavy meals. The physical demands of the hike require steady fuel, but you won't want to carry excess weight during the challenging sections. Plan to eat small amounts regularly rather than large meals.
Physical preparation for the Angels Landing hike should begin weeks before your visit to Zion National Park. I recommend training with hikes that include significant elevation gain, practicing balance and stability exercises, and building cardiovascular endurance through regular cardio workouts. Stair climbing is particularly beneficial for preparing for Walter's Wiggles and the overall elevation gain of the trail.
Mental preparation is equally important, especially for the chains section. I recommend watching videos of the trail, studying photos of the exposure, and honestly assessing your comfort level with heights and technical terrain. There's no shame in deciding that Angels Landing isn't for you – Scout Lookout provides 90% of the experience with significantly less risk and technical difficulty.
Conclusion
Hiking Angels Landing in Zion National Park represents one of the most rewarding and memorable adventures available in the American national park system. Through my multiple experiences on this iconic trail, I've learned that success depends on careful preparation, respect for the natural environment, and honest assessment of your own abilities and comfort levels.
The permit system, while initially seeming like an obstacle, has dramatically improved the safety and enjoyment of the Zion National Park Angels Landing experience. Smaller crowds mean less congestion on the chains section, shorter wait times, and a more intimate connection with this spectacular landscape. I encourage hikers to plan ahead, apply for permits early, and remain flexible with their travel dates to maximize their chances of securing access to this incredible adventure.
The views from the Angels Landing summit – encompassing the entirety of Zion Canyon, the Virgin River winding through the desert floor, and the towering sandstone formations that define this landscape – justify every challenging step of the journey. Standing on that narrow summit, surrounded by 360-degree panoramic views of some of America's most spectacular scenery, creates memories that will last a lifetime.
Safety must remain the top priority for anyone attempting the Angels Landing hike. The technical nature of the chains section, combined with significant exposure and changeable weather conditions, demands careful preparation and conservative decision-making. I always remind fellow hikers that the mountain will be there tomorrow – turning back due to adverse conditions or personal comfort levels is always the right choice.
For those who complete the full Angels Landing experience, you'll join an exclusive group of adventurers who have witnessed one of the most spectacular vistas in the American West. The sense of accomplishment, combined with the unparalleled beauty of the Zion National Park Angels Landing area, creates an adventure that will inspire future outdoor pursuits and provide stories to share for years to come.
Whether this is your first visit to Zion National Park or you're returning to attempt Angels Landing again, I hope this comprehensive guide helps you prepare for a safe, successful, and unforgettable adventure. The red rocks of Zion await, and the summit of Angels Landing offers rewards that extend far beyond the physical achievement of reaching the top. Take your time, stay safe, and prepare to be amazed by one of nature's most incredible spectacles.
Have you hiked Angels Landing? Share your experience and tips in the comments below to help fellow adventurers prepare for this incredible Zion National Park challenge.