


Ultimate Layering System for Hiking: Master the Art of Staying Warm, Dry & Comfortable
After a decade of exploring trails from the Rocky Mountains to Patagonia, I've learned that mastering the layering system for hiking is absolutely crucial for any outdoor adventure. This comprehensive guide will teach you how to build the perfect clothing system that adapts to changing weather conditions, keeps you comfortable during strenuous climbs, and could literally save your life in emergency situations. Whether you're planning a day hike or a multi-week trek, understanding how to layer properly will transform your hiking experience. Nature Guests has been your trusted outdoor resource for years, and today I'm sharing everything I know about creating the ultimate hiking clothing system.
Understanding the Three-Layer System
The layering system for hiking is built on a simple yet ingenious three-layer approach that I've relied on during countless adventures. Each layer serves a specific purpose, and when combined correctly, they create a dynamic clothing system that adapts to changing conditions throughout your hike.During my ascent of Mount Whitney last September, I experienced firsthand why understanding this system is crucial. Starting at 4 AM in near-freezing temperatures, I wore all three layers. As the sun rose and we gained elevation, I systematically removed layers to prevent overheating. By afternoon, when storm clouds gathered, I quickly added layers back for protection. This flexibility is what makes the layering system for hiking so effective.
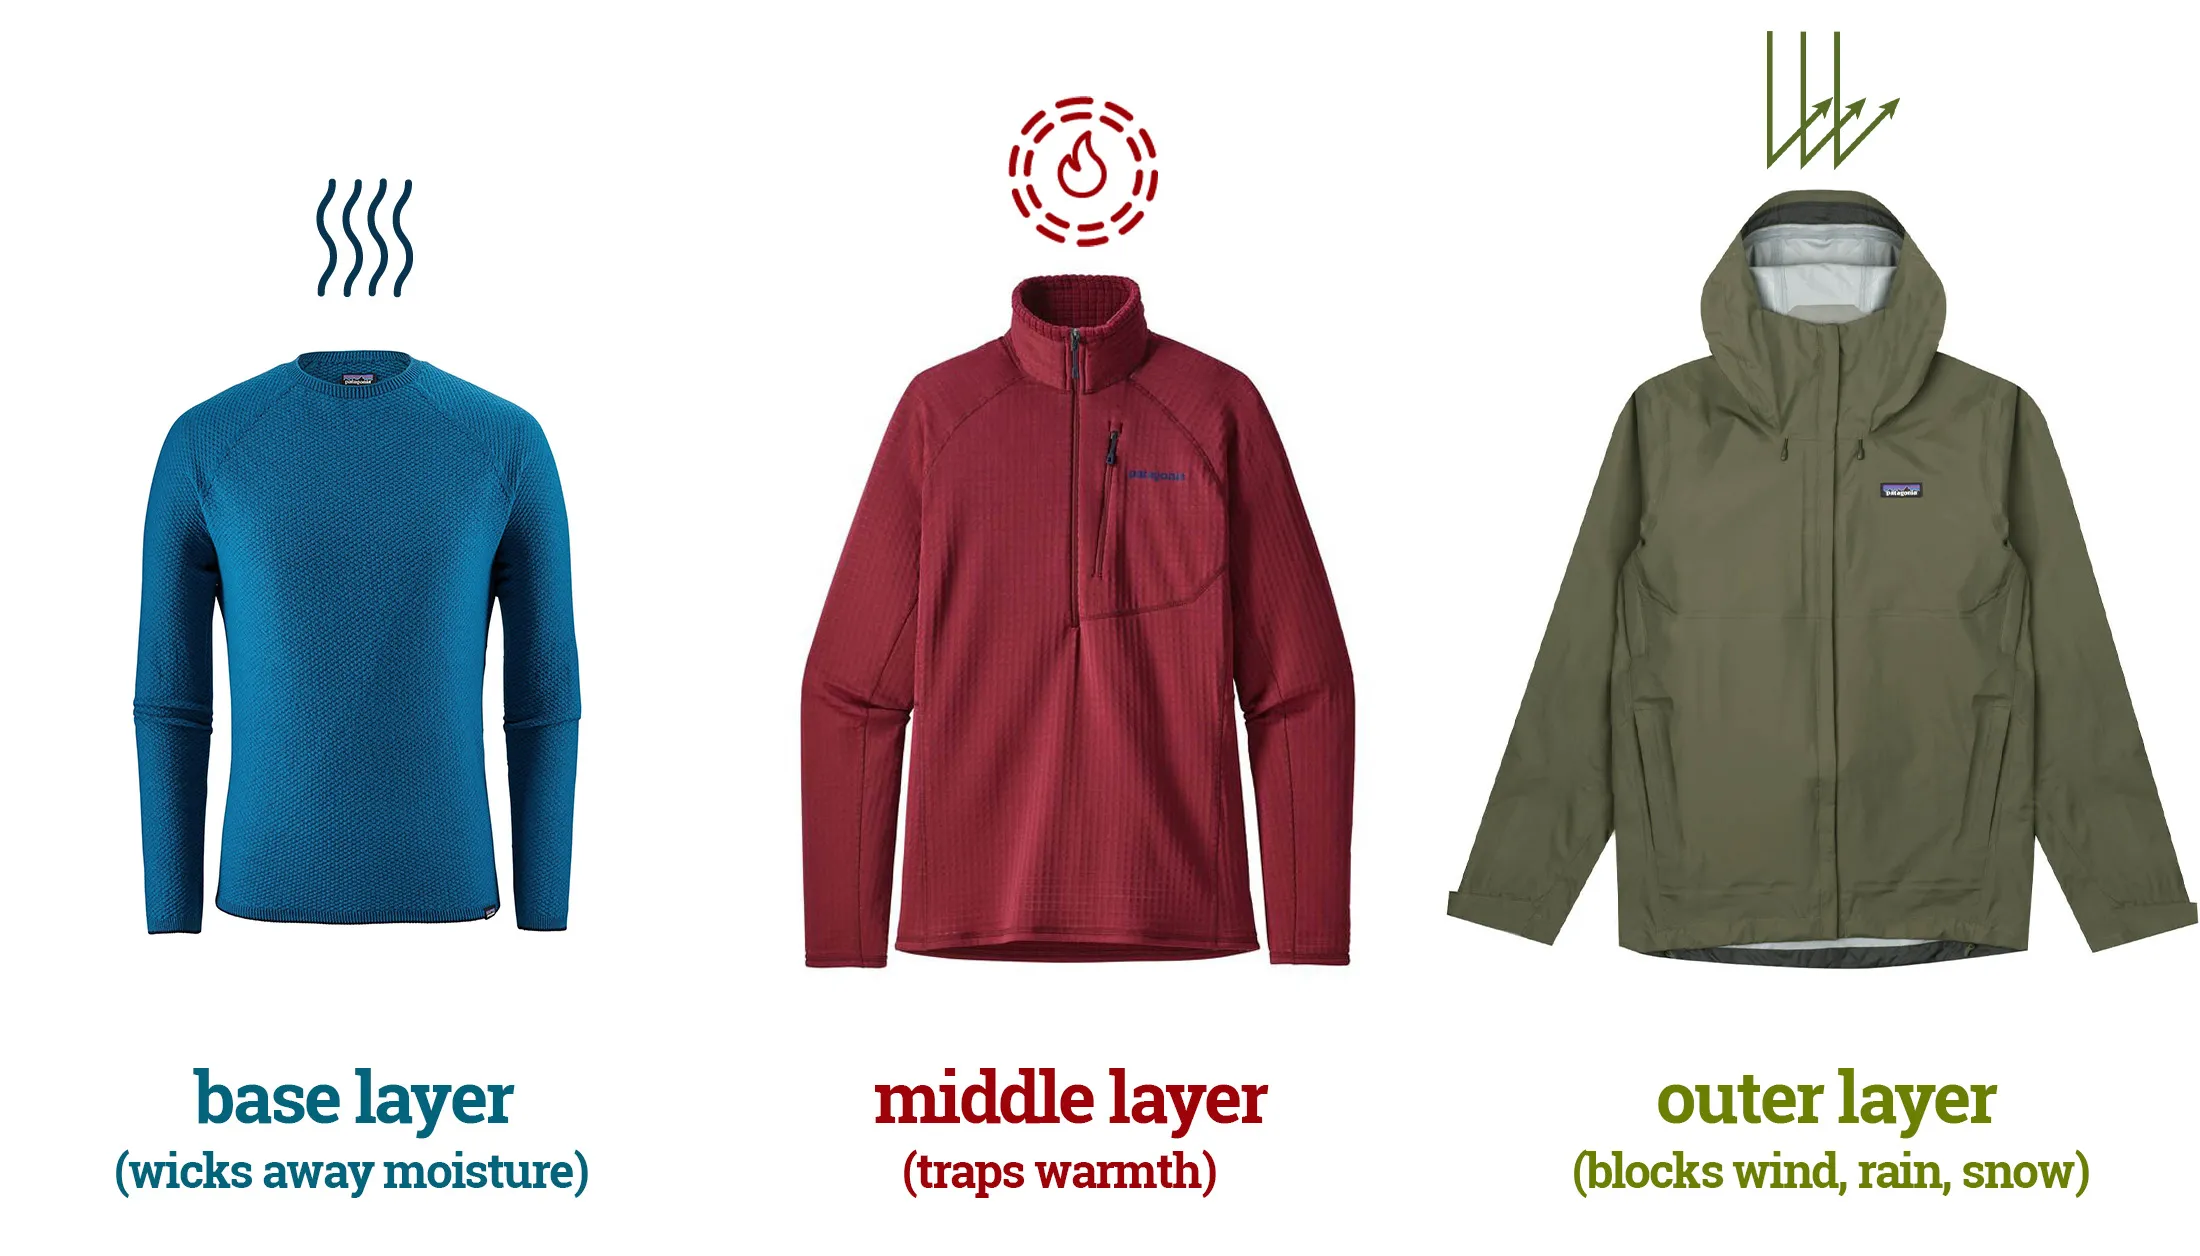
The base layer functions as your foundation, sitting directly against your skin to manage moisture. Think of it as your personal climate control system – it wicks sweat away from your body during intense climbs and retains warmth when you stop for breaks. The mid-layer provides insulation, trapping warm air close to your body while still allowing moisture to escape. Finally, the outer shell protects you from wind, rain, and snow while maintaining breathability.
What I love most about this system is its modularity. You're not locked into wearing all three layers at once. On a warm summer day, you might only need a base layer and light outer shell. During winter conditions, you might add multiple mid-layers for extra warmth. This adaptability makes the layering system for hiking suitable for any climate or season.
Pro Tip from the Trail: Always pack one extra layer beyond what you think you'll need. Weather in the mountains can change rapidly, and hypothermia can set in quickly when you're unprepared.
Base Layer Essentials: Your Foundation for Comfort
The base layer is arguably the most critical component of your layering system for hiking. I learned this lesson the hard way during an early hiking trip in the Cascades when I wore a cotton t-shirt. As soon as I started sweating on the uphill sections, the cotton became saturated and stayed wet throughout the hike. When we stopped for lunch in the shade, I became dangerously cold as the wet fabric conducted heat away from my body.
Modern base layers are engineered with advanced moisture-wicking fabrics that transport sweat away from your skin to the outer surface where it can evaporate. The two primary material choices are merino wool and synthetic fabrics, each with distinct advantages. Merino wool naturally resists odors and provides excellent temperature regulation – I can wear the same merino base layer for multiple days on backpacking trips without developing unpleasant smells. It also retains insulating properties even when damp.
Synthetic base layers, typically made from polyester or polyester blends, excel in high-output activities. They dry faster than wool and are generally more durable and affordable. For the best hiking clothes for women, synthetic base layers often provide a better fit and wider range of styles.
Recommended Base Layer Products
Fit is crucial for base layers in your layering system for hiking. They should be snug but not restrictive, allowing for full range of motion while maintaining good contact with your skin for effective moisture transfer. Avoid base layers that are too loose, as air gaps reduce wicking efficiency, or too tight, which can restrict circulation and cause chafing during long hikes.
Weight categories in base layers range from ultralight (150-200 GSM) for warm weather and high-output activities, to midweight (200-250 GSM) for general three-season use, to heavyweight (250+ GSM) for cold weather and low-activity situations. I typically carry a lightweight merino base layer for most of my hiking, as it provides the best balance of comfort and versatility across different conditions.
Mid-Layer Selection Guide: Insulation That Works
The mid-layer serves as the insulation component of your layering system for hiking, and choosing the right one can make the difference between a comfortable hike and a miserable experience. During my trek through Torres del Paine, the mid-layer became my best friend as Patagonian winds howled across the exposed sections while temperatures fluctuated wildly throughout each day.
Fleece jackets represent the most popular mid-layer choice for good reason. They provide excellent warmth-to-weight ratio, breathe well during active pursuits, and maintain insulating properties even when damp. Modern fleece comes in various weights and constructions, from lightweight grid fleeces that prioritize breathability to heavyweight options that maximize warmth. For most hikers, a midweight fleece (200-300 weight) offers the best versatility in a layering system for hiking.
Down insulation provides superior warmth-to-weight ratio compared to any other material, making it ideal for cold, dry conditions. However, down loses its insulating properties when wet and takes a long time to dry. I reserve my down mid-layers for alpine environments and winter hiking where precipitation is unlikely to be rain. The key advantage is packability – a down jacket compresses to a fraction of its lofted size, saving valuable pack space.
Synthetic insulation has improved dramatically in recent years, with new technologies offering near-down performance while maintaining insulation when wet. Synthetic mid-layers dry quickly and are generally less expensive than down alternatives. For wet climates or conditions where you might encounter rain, synthetic insulation is often the smarter choice for your layering system for hiking.
Active vs. Static Insulation
Understanding the difference between active and static insulation is crucial for optimizing your layering system for hiking. Active insulation, designed for continuous movement, features more breathable materials and athletic cuts that don't restrict motion. These pieces work well during the hiking portions of your adventure. Static insulation, built for stationary activities like camp time or rest breaks, prioritizes maximum warmth retention over breathability.
I typically carry one active insulation piece (usually a fleece jacket) that I can wear while hiking in cold conditions, and one static piece (often a synthetic or down jacket) for camp use and emergency situations. This combination provides maximum versatility without excessive weight penalty.
Top Mid-Layer Recommendations
Outer Shell Protection: Your Weather Barrier
The outer shell completes your layering system for hiking by providing essential protection from wind, rain, and snow. This layer must perform a delicate balancing act: keeping external moisture out while allowing internal moisture (your perspiration) to escape. Getting this balance wrong can leave you soaked from the inside out, regardless of how waterproof your jacket claims to be.
During a particularly challenging section of the GR20 in Corsica, I experienced the full spectrum of weather in a single day. Morning brought dense fog and drizzle, afternoon delivered blazing sunshine, and evening surprised us with a thunderstorm complete with hail. My shell jacket needed to handle all these conditions while remaining breathable enough to prevent overheating during steep climbs.
Hard shells represent the most protective option in your layering system for hiking. These jackets use waterproof-breathable membranes like Gore-Tex to provide maximum weather protection. They excel in sustained rain and harsh conditions but can feel less comfortable during high-exertion activities due to reduced breathability. Hard shells work best when you prioritize protection over comfort, such as during exposed alpine routes or multi-day treks with unpredictable weather.

Soft shells offer a more comfortable alternative for many hiking situations. These jackets emphasize breathability and stretch over maximum waterproofness, making them ideal for active pursuits in mixed conditions. While they won't keep you dry in heavy rain, soft shells excel during light precipitation, windy conditions, and situations where you're generating significant body heat. Many experienced hikers prefer soft shells for the majority of their hiking because of their superior comfort and versatility.
Ultralight rain jackets have gained popularity among backpackers and day hikers who prioritize weight savings. These minimalist designs strip away non-essential features to achieve impressive pack weights, often under 6 ounces. While they sacrifice some durability and features, ultralight shells can be perfect for emergency protection or fast-and-light adventures where every ounce matters in your layering system for hiking.
Essential Shell Features
When selecting a shell for your layering system for hiking, certain features significantly impact performance and usability. A properly designed hood should accommodate a helmet if needed while providing good peripheral vision. Pit zips (underarm vents) allow rapid temperature regulation without removing the jacket entirely – I use these constantly during variable weather conditions.
Pocket placement and design matter more than you might expect. Chest pockets should be accessible while wearing a backpack, and hand pockets should have storm flaps or waterproof zippers. The hem should be adjustable to prevent wind and rain from entering, and cuff closures should seal effectively around your wrists while accommodating gloves.
For those interested in complete hiking outfit ideas, remember that your shell layer needs to coordinate with your entire clothing system, not just function independently.
Shell Layer Recommendations
Seasonal Layering Strategies: Adapting to Nature's Moods
Mastering the layering system for hiking requires understanding how to modify your approach based on seasonal conditions. Each season presents unique challenges and opportunities that demand specific layering strategies. Over my years of hiking, I've learned that a one-size-fits-all approach simply doesn't work when nature serves up such diverse conditions throughout the year.
Spring hiking often provides the most challenging layering scenarios because conditions can change rapidly as winter transitions to summer. Morning temperatures might hover near freezing while afternoon highs reach into the 70s. During my recent hike through Zion National Park in April, I started with all three layers and ended the day hiking in just my base layer. The key for spring layering system for hiking success is choosing versatile pieces that pack small and layer efficiently.
Summer layering focuses primarily on sun protection and temperature regulation rather than warmth retention. However, don't underestimate the importance of maintaining a proper layering system for hiking even in warm weather. High-altitude environments can become surprisingly cold, especially during storms or at night. I always carry a lightweight insulation layer and shell even on hot summer days, having been caught off-guard by afternoon thunderstorms that dropped temperatures by 30 degrees in minutes.
Fall hiking requires careful attention to the cooling trend and potential for first winter storms. This season offers some of the best hiking conditions but also demands respect for rapidly changing weather patterns. Your layering system for hiking needs to handle crisp mornings, warm afternoons, and the possibility of early snow at elevation. I typically increase the warmth rating of all my layers during fall hiking while maintaining the same three-layer structure.
Winter layering becomes truly critical as the margin for error shrinks significantly. Cold weather amplifies the consequences of poor layering decisions, potentially leading to hypothermia or frostbite. Your layering system for hiking must keep you warm during low-activity periods while preventing overheating during climbs. This often means carrying heavier layers and accepting increased pack weight for the sake of safety.
Elevation and Exposure Considerations
Elevation dramatically affects your layering system for hiking requirements regardless of season. Temperature drops approximately 3.5°F for every 1,000 feet of elevation gain, meaning the summit can be 20-30 degrees colder than the trailhead. Additionally, wind exposure increases with elevation, creating dangerous wind chill effects that your layering system must counteract.
I learned this lesson definitively during my ascent of Mount Shasta, where calm conditions at the trailhead gave way to 60 mph winds and sub-zero temperatures near the summit. Having the right gear is only half the battle – you must also understand how to use your layering system for hiking effectively in extreme conditions.
When planning your layering strategy, consider not just the weather forecast but also your route's exposure characteristics. Tree-covered trails provide natural wind protection and thermal regulation, while open ridges and alpine zones expose you to the full force of mountain weather. Adjust your layering system for hiking expectations accordingly.
Safety Warning: Always check weather forecasts and trail conditions before heading out. Mountain weather can change rapidly, and being caught unprepared with inadequate layering can be life-threatening.
Common Layering Mistakes to Avoid
Even experienced hikers make layering mistakes that can compromise comfort and safety. Throughout my hiking journey, I've made plenty of these errors myself and learned valuable lessons from each one. Understanding these common pitfalls will help you optimize your layering system for hiking and avoid uncomfortable or dangerous situations on the trail.
The most frequent mistake I observe is wearing cotton in any layer of the system. Cotton retains moisture, loses insulating properties when wet, and takes forever to dry. I still remember my first backpacking trip wearing cotton everything – I was miserable, cold, and learned why cotton is called "death cloth" among experienced hikers. Your entire layering system for hiking should be built around moisture-wicking, quick-drying materials.
Over-layering is another common error that leads to overheating and excessive sweating. The goal isn't to stay warm at the trailhead; it's to maintain comfort throughout your entire hike. I typically start hiking feeling slightly cool, knowing that my body will warm up within the first 10-15 minutes of activity. Starting too warm inevitably leads to removing layers shortly after beginning, which wastes time and energy.
Conversely, under-layering can be equally problematic and potentially dangerous. Some hikers, trying to minimize pack weight, leave essential layers at home and get caught unprepared when weather deteriorates. Your layering system for hiking should always include one extra insulation layer beyond what you expect to need. Weather in the mountains can change rapidly, and that extra layer might save your life.
Ignoring fit is a subtle but important mistake that affects the performance of your entire system. Layers should fit together harmoniously – your base layer snug but not restrictive, mid-layer roomy enough to accommodate the base layer without compression, and shell large enough to fit over everything without restricting movement. Poor fit compromises both comfort and the technical performance of your layering system for hiking.
Many hikers also make the mistake of thinking expensive automatically means better. While quality gear is important, the most expensive option isn't always the best choice for your specific needs. Focus on finding gear that matches your hiking style, typical conditions, and budget rather than simply buying the most premium options available.
Maintenance and Care Mistakes
Proper care and maintenance of your layering system for hiking directly impacts its performance and longevity. Many hikers ruin expensive gear through improper washing, storage, or treatment. Merino wool requires different care than synthetic materials, and technical shells need periodic DWR (Durable Water Repellent) treatment renewal to maintain their water-shedding capabilities.
Storage mistakes can also compromise your gear. Storing down insulation compressed for extended periods reduces its loft and insulating efficiency. Shell jackets should be stored uncompressed and in a cool, dry place to prevent delamination of waterproof membranes. Taking proper care of your gear ensures your layering system for hiking performs optimally trip after trip.
For comprehensive gear recommendations including the best hiking backpacks to carry your layering system and hiking hydration packs to stay properly fueled, our extensive gear guides provide tested recommendations for every aspect of your outdoor adventures.
Conclusion
Mastering the layering system for hiking is one of the most valuable skills you can develop as an outdoor enthusiast. This three-layer approach – base layer for moisture management, mid-layer for insulation, and outer shell for protection – provides the flexibility to handle virtually any weather condition you'll encounter on the trail.
The key to success lies in understanding that your layering system for hiking is greater than the sum of its parts. Each layer must work harmoniously with the others, and you must be prepared to add or remove layers as conditions change throughout your hike. This dynamic approach to clothing management will keep you comfortable, safe, and able to enjoy your outdoor adventures regardless of what Mother Nature delivers.
Remember that developing an effective layering system for hiking is an ongoing process. Every hike teaches you something new about how your body responds to different conditions and how your gear performs in real-world situations. Don't be afraid to experiment with different combinations and learn from both successes and mistakes.
Start building your layering system gradually, focusing on quality pieces that will serve you well across multiple seasons and activities. Invest in good base layers first, as these form the foundation of your entire system. Add versatile mid-layers that work across a range of conditions, and finally choose shell layers that match your typical hiking environments.
Most importantly, practice using your layering system for hiking on shorter, less committing hikes before heading out on major adventures. Understanding how your gear performs and how your body responds to different layering combinations will give you the confidence to tackle more challenging objectives safely and comfortably.
The trails are calling, and with a properly designed layering system, you'll be ready to answer that call in any weather. Whether you're planning day hikes in local mountains or multi-week expeditions to remote wilderness areas, your layering system for hiking will be the foundation that enables countless memorable adventures in the great outdoors. For more comprehensive outdoor guidance and gear recommendations, continue exploring our resources at our complete layering guide.
Ready to Build Your Perfect Layering System?
Start with these essential pieces and build your system gradually: