


After spending countless winters exploring Death Valley National Park during its surprisingly cold desert nights and trekking through snow-covered trails from Mount Rushmore to Yellowstone, I've learned that knowing how to layer clothes for winter is the difference between an unforgettable adventure and a miserable experience. In this comprehensive guide, I'll share everything I've discovered about the three-layer system, the best gear combinations, and the mistakes that can leave you either freezing or overheating on the trail. Whether you're planning winter hikes through America's most stunning landscapes or simply need to stay warm during daily activities, this guide from Nature Guests will transform how you approach winter clothing.
Understanding the Three-Layer System: The Science Behind Winter Comfort
When I first started winter hiking in the mountains, I made the classic mistake of throwing on a heavy winter coat and hoping for the best. The result? I was either sweating during the uphill climbs or shivering during rest breaks. Learning how to layer clothes for winter properly changed everything, and the three-layer system became my foundation for comfortable outdoor adventures.
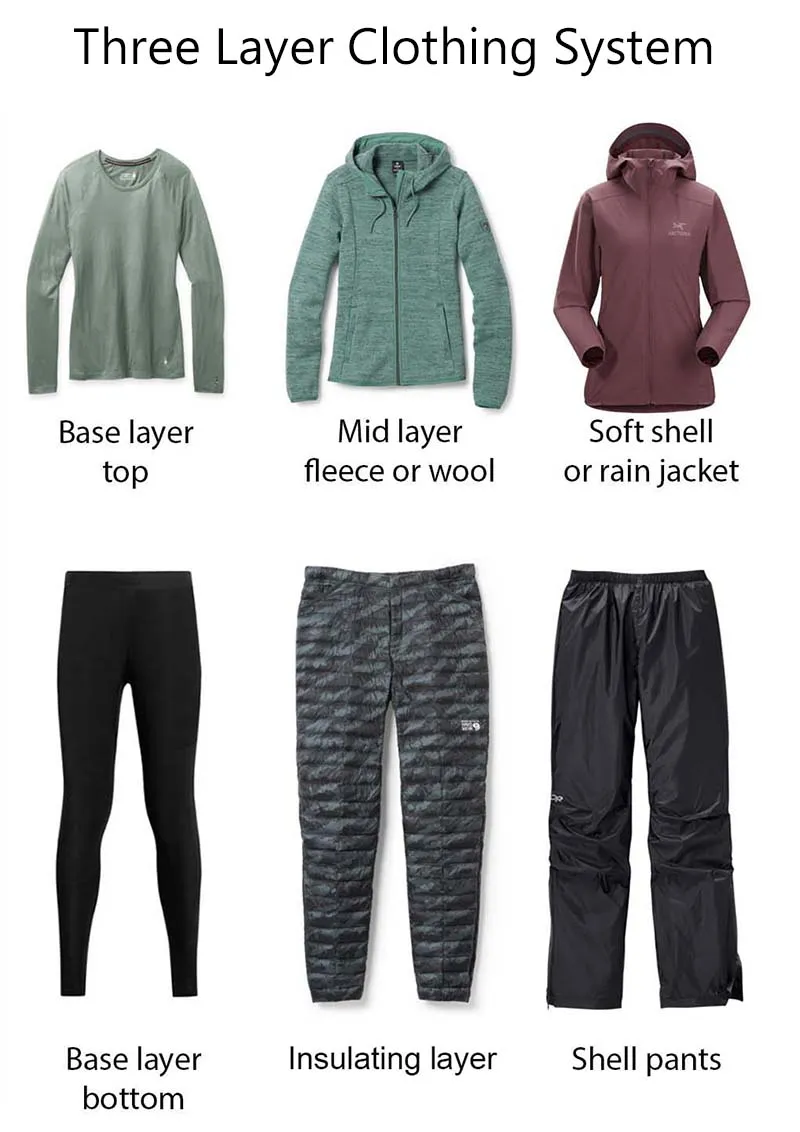
The three-layer system isn't just outdoor gear marketing—it's based on solid principles of thermoregulation and moisture management. Each layer has a specific job: the base layer wicks moisture away from your skin, the mid layer traps warm air for insulation, and the outer layer protects you from wind, rain, and snow while allowing moisture to escape.
What makes this system brilliant is its adaptability. During a recent winter trek through challenging national park terrain, I started the morning with all three layers, removed my mid layer during the strenuous climb, added it back during lunch, and put on my outer shell when snow began falling. This flexibility is impossible with a single heavy jacket.
Pro Tip from the Trail
The key to mastering how to layer clothes for winter is understanding that you should be slightly cool when you start moving. If you're perfectly warm while stationary, you'll likely overheat once you begin hiking or engaging in activity. Start cool, stay comfortable.
Watch this comprehensive video guide to understanding winter layering principles and practical applications
Base Layer: Your Foundation for Warmth and Comfort
Your base layer is arguably the most critical component when you learn how to layer clothes for winter effectively. I've tested dozens of base layers over the years, from budget synthetic options to premium merino wool pieces, and the difference in comfort is dramatic. A good base layer should feel like a second skin—snug but not restrictive, smooth against your skin, and completely unnoticeable once you're moving.
The primary job of your base layer is moisture management, not warmth. When you're active in cold weather, your body produces moisture that needs to be moved away from your skin quickly. Cotton is terrible for this—it absorbs moisture and holds it against your skin, creating a clammy, cold feeling that can become dangerous in freezing conditions.
Critical Safety Note
Never wear cotton as a base layer in winter conditions. The old saying "cotton kills" exists for a reason—wet cotton next to your skin in cold weather can lead to hypothermia.
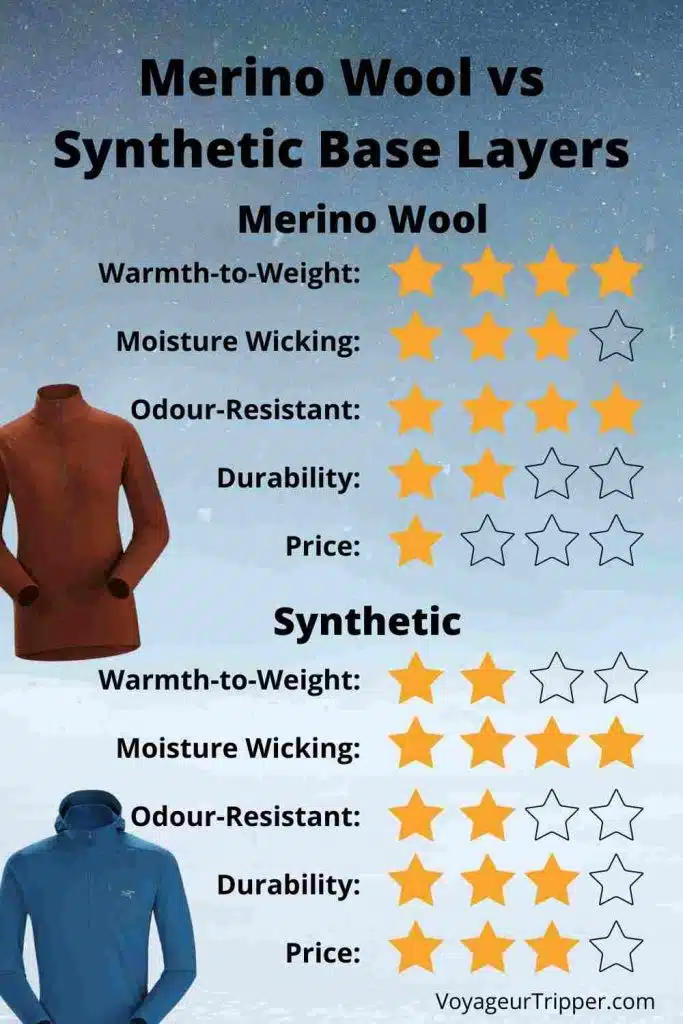
Material Choices: Merino Wool vs. Synthetic Fabrics
Merino Wool Base Layers
- Natural odor resistance—can be worn multiple days
- Excellent temperature regulation
- Comfortable against skin, even for sensitive wearers
- Retains warmth even when damp
- More expensive but longer-lasting
Best for: Multi-day trips, sensitive skin, varying activity levels
Synthetic Base Layers
- Quick-drying and durable
- More affordable price point
- Excellent for high-intensity activities
- Easy care and maintenance
- Can retain odors more quickly
Best for: High-intensity activities, budget-conscious buyers, frequent washing
My Top Base Layer Recommendations
Premium merino wool that I've personally tested on winter expeditions. Excellent moisture-wicking and natural odor resistance.
Trusted brand with proven performance. Slightly heavier weight perfect for cold conditions and extended wear.
Mid Layer: The Heart of Your Insulation System
The mid layer is where the magic happens in learning how to layer clothes for winter effectively. This is your primary insulation—the layer that traps warm air and keeps your core temperature stable. Unlike your base layer, which should always stay on, your mid layer is the one you'll add and remove most frequently as conditions and activity levels change.
I've learned through years of winter adventures that having multiple mid layer options is crucial. On a typical day in the mountains, I might start with a lightweight fleece, add a down jacket during rest stops, and switch to just the down jacket when temperatures drop significantly in the evening. This flexibility is what separates comfortable winter enthusiasts from those who suffer through cold conditions.
The key principle of mid layer insulation is trapped air. All insulating materials—whether down, synthetic fill, or fleece—work by creating dead air space that your body heat warms up. The more efficiently a material traps air, the warmer it keeps you for its weight and bulk.
Fleece: The Versatile Workhouse
Fleece jackets are my go-to mid layer for active pursuits. They breathe well during exertion, dry quickly if they get damp, and maintain insulation even when wet. The downside is that wind cuts right through fleece, so it needs to be paired with a wind-resistant outer layer in breezy conditions.
Down vs. Synthetic Insulation: The Great Debate
Down Insulation
- Superior warmth-to-weight ratio
- Highly compressible for packing
- Long-lasting with proper care
- Loses insulation when wet
- Higher cost but better long-term value
- Best for dry, cold conditions
Fill Power Explained: 600-700 fill power is good for most conditions, 700-800 is premium performance, 800+ is ultralight expedition gear.
Synthetic Insulation
- Maintains warmth when wet
- Faster drying than down
- More affordable price point
- Bulkier and heavier than down
- Less compressible for travel
- Best for humid or wet conditions
Modern synthetics like PrimaLoft and Thinsulate have significantly improved, offering near-down performance with wet-weather reliability.
Top Mid Layer Picks from My Gear Arsenal
$26.99 - Perfect for active pursuits and layering versatility
$49.99 - Budget-friendly packable option for camp use
$83.57 - Premium down for serious cold conditions
Outer Layer: Your Shield Against the Elements
The outer layer is your final defense against winter's worst conditions, and getting it right is essential for mastering how to layer clothes for winter safely. This layer's job is simple in concept but complex in execution: keep wind, rain, and snow out while allowing moisture from your body to escape. The challenge lies in balancing waterproof protection with breathability.
I learned the importance of a quality shell layer during a winter storm in the Rockies. My cheap rain jacket kept the snow out but trapped so much moisture inside that I was soaked with sweat within an hour. A proper shell jacket with good breathability would have kept me dry from both external precipitation and internal moisture.
Your outer layer choice depends heavily on your intended use. For winter hiking and active pursuits, you want maximum breathability. For static activities like winter camping or photography, you can prioritize weather protection over ventilation.
Understanding Shell Jacket Categories
Waterproof/Breathable
Premium shells using Gore-Tex or similar membranes. Best for serious weather and extended exposure.
Price Range: $150-$400+
Softshell
Stretchy, breathable, wind and water resistant. Perfect for active pursuits in moderate conditions.
Price Range: $80-$200
Budget Shells
Basic water resistance for light conditions. Good for emergency use or casual wear.
Price Range: $30-$80
Shell Layer Pro Tips from the Field
- Ventilation is crucial: Look for shells with pit zips, adjustable hoods, and multiple pocket vents
- Fit for layering: Size up to accommodate your base and mid layers without restricting movement
- DWR maintenance: Reapply water-repellent treatment annually to maintain performance
- Backup plan: Always carry a lightweight emergency shell, even on clear days
Battle-Tested Outer Layer Recommendations
Reliable, affordable waterproof shell that I've tested in mountain storms. Great balance of protection and breathability.
Lightweight emergency shell that packs down small. Perfect backup layer for changing conditions.
Advanced Layering Strategies: Beyond the Basics
Once you've mastered the basic three-layer system for how to layer clothes for winter, there are advanced techniques that can dramatically improve your comfort and safety. These strategies come from years of winter adventures, mistakes made, and lessons learned the hard way.
The Fourth Layer: Extremity Management
Hands and Arms
- Liner gloves under insulated mittens
- Wrist warmers to seal gaps
- Chemical hand warmers for extreme cold
- Spare gloves in case of wet conditions
Cold hands can end an adventure quickly. Always have backup plans for hand warmth.
Feet and Legs
- Moisture-wicking sock liners
- Insulated, cushioned outer socks
- Gaiters to prevent snow entry
- Insulated pants for static activities
Your feet bear your weight and take the most abuse. Invest in quality footwear systems.
Activity-Specific Layering Systems
Winter Hiking
Start cool, remove layers when active, add back during breaks.
Focus: Maximum adjustability and breathability
Winter Camping
Layer up for extended static periods, down sleeping bags.
Focus: Maximum warmth retention and comfort
Winter Sports
Specialized gear for specific activities, ventilation critical.
Focus: Performance and moisture management
Common Layering Mistakes That Can Be Dangerous
- Over-layering at start: Beginning your day too warm leads to excessive sweating
- Cotton anywhere: Cotton base layers or socks can cause hypothermia
- Ignoring extremities: Poor hand/foot warmth can force early retreat
- Single heavy layer: No adjustment options for changing conditions
- Poor layer fit: Too tight restricts circulation, too loose reduces insulation
- Inadequate backup: Not carrying extra layers for emergencies
Complete Layering System: My Tested Gear Recommendations
After years of testing gear in winter conditions across different climates and activities, I've developed specific recommendations for complete layering systems. These aren't just theoretical suggestions—they're pieces I actually use and trust with my safety in the backcountry.
Budget-Conscious System ($200-300)
Base Layer
Thermajohn Thermal Set - $29.99Synthetic blend that wicks well and dries fast. Great entry-level option.
Mid Layer
Amazon Essentials Fleece - $22.40Reliable fleece that punches above its weight class for warmth and durability.
Outer Layer
Frogg Toggs Rain Jacket - $19.97Basic but functional waterproof protection for emergency use.
Total System Cost: ~$250
Perfect for getting started or as backup gear
Premium System ($600-800)
Base Layer
Smartwool Merino Set - $200Premium merino wool with superior comfort and odor resistance.
Mid Layer
Eddie Bauer Down Jacket - $83.57High-quality down insulation with excellent warmth-to-weight ratio.
Outer Layer
Columbia Watertight II - $52.90Proven waterproof-breathable shell for serious weather protection.
Total System Cost: ~$725
Professional-grade performance for serious adventurers
Essential Accessories for Complete Systems
$15-25 - Moisture-wicking comfort
$12-20 - Hand warmth system
$15-30 - Critical heat retention
$10-25 - Versatile warmth
Conclusion: Mastering Winter Comfort Through Smart Layering
Learning how to layer clothes for winter effectively is one of the most valuable skills for anyone who spends time outdoors during cold months. It's the difference between memorable adventures and miserable experiences, between safety and potential danger in challenging conditions.
The three-layer system—moisture-wicking base layer, insulating mid layer, and protective outer layer—provides the foundation for comfort in any winter activity. But the real mastery comes from understanding how to adjust this system for different conditions, activity levels, and personal comfort preferences.
Remember that the best layering system is the one you'll actually use and adjust throughout the day. Start with quality basics, learn how your body responds to different conditions, and gradually build a system that works reliably for your adventures. Whether you're exploring the winter landscapes of our greatest American destinations or simply staying comfortable during daily winter activities, proper layering will transform your cold-weather experience.
The investment in quality layering pieces pays dividends in comfort, safety, and enjoyment of winter activities. Start with the basics, test your system in controlled conditions, and gradually expand your gear collection based on actual experience and specific needs.
Ready for Your Next Winter Adventure?
Put your layering knowledge to the test on epic winter journeys. Explore our guides to winter destinations and gear recommendations to make your next cold-weather adventure unforgettable.