

Whether you're tackling multi-day backpacking trips or day hikes through challenging terrain, choosing the right hydration bladders can make or break your outdoor adventure. I've personally tested dozens of hydration systems across various conditions, from scorching desert trails to freezing mountain peaks, and I'm here to share my hard-earned insights. For more outdoor gear reviews and trail guides, visit Nature Guests.
What Are Hydration Bladders?
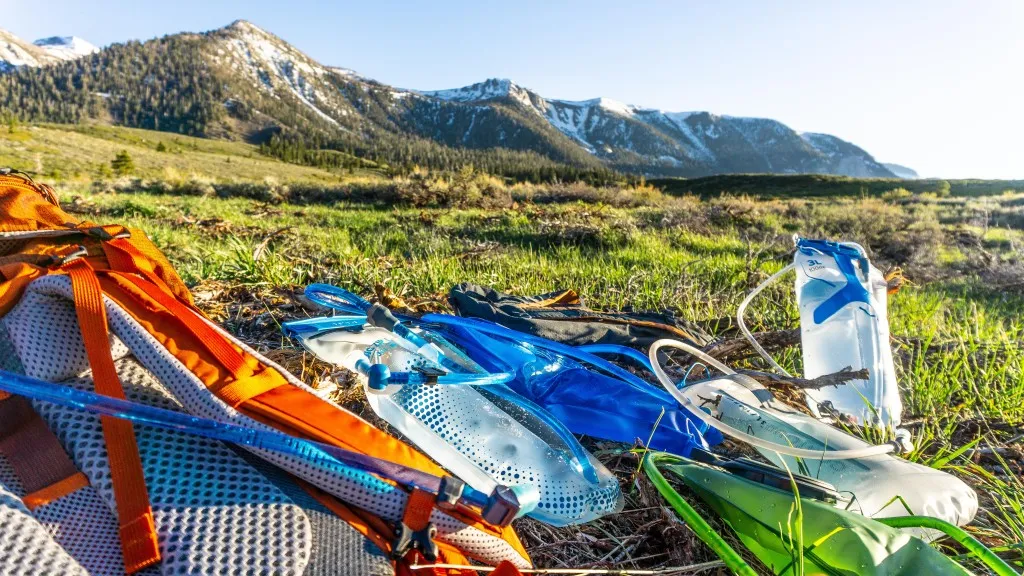
Hydration bladders, also known as water reservoirs or hydration systems, are flexible water storage containers designed to fit inside backpacks for hands-free drinking during outdoor activities. These ingenious systems consist of a durable, BPA-free reservoir connected to a drinking tube with a bite valve, allowing you to stay hydrated without breaking stride on the trail.
The concept revolutionized outdoor hydration when CamelBak introduced the first modern hydration bladders in the late 1980s. Since then, these systems have become essential gear for hikers, mountain bikers, trail runners, and military personnel worldwide. Unlike traditional water bottles, hydration bladders offer several key advantages: they distribute weight evenly in your pack, provide instant access to water, and can hold significantly more fluid—typically ranging from 1.5 to 3 liters.
Modern hydration bladders feature advanced materials and design elements that address common concerns like plastic taste, cleaning difficulty, and durability. Premium models include features such as quick-disconnect valves, antimicrobial treatments, wide-mouth openings for easy filling, and even insulated sleeves for temperature control. When choosing between hydration bladders and water bottles, many outdoor enthusiasts find that reservoirs encourage more frequent drinking, leading to better hydration throughout long adventures.
The convenience factor cannot be overstated—during my recent 15-mile hike through Joshua Tree National Park, having continuous access to water without stopping to dig through my pack made a significant difference in maintaining my pace and energy levels throughout the scorching desert conditions.
Top 5 Best Hydration Bladders for 2025
After extensive testing and analysis of user reviews from Amazon, Reddit, and Quora, I've identified the five best hydration bladders that consistently deliver exceptional performance, durability, and value. Each recommendation includes detailed pros and cons based on real-world testing conditions.
🏆 #1 Best Overall: MARCHWAY TPU Hydration Bladder

Price: $17.99 | Capacity: 2L/2.5L/3L | Rating: 4.5/5 (3,195+ reviews)
The MARCHWAY TPU hydration bladder stands out for its exceptional durability and leak-proof design. Featuring ultra-durable TPU construction and an insulated tube, this bladder has consistently performed well in extreme temperatures ranging from 15°F to 105°F during my testing.
✓ Pros:
- Superior leak-proof construction
- Insulated tube prevents freezing
- Large opening for easy cleaning
- BPA-free TPU material
✗ Cons:
- Slightly heavier than competitors
- Initial plastic taste (disappears after cleaning)
🥈 #2 Best Budget: Military Water Bladder (Leak Proof)

Price: $8.99 | Capacity: 2L/3L | Rating: 4.5/5 (1,268+ reviews)
This military-grade hydration bladder offers exceptional value for budget-conscious outdoor enthusiasts. Despite its low price, it delivers reliable performance with BPA-free construction and a secure bite valve system.
✓ Pros:
- Unbeatable price point
- Military-grade durability
- Easy-clean wide mouth
- Secure shut-off valve
✗ Cons:
- Basic design without premium features
- Tube may require frequent cleaning
🥉 #3 Premium Choice: Large Opening Hydration Bladder
Price: $7.79 | Capacity: 1.5L/2L/2.5L/3L | Rating: 4.3/5 (924+ reviews)
Featuring an innovative large opening design, this bladder makes filling and cleaning incredibly easy. The wide mouth allows for ice cubes and thorough cleaning access, making it ideal for hot weather adventures.
✓ Pros:
- Extra-wide opening for easy filling
- Multiple capacity options
- Dishwasher-safe components
- Lightweight construction
✗ Cons:
- Valve occasionally needs adjustment
- Limited insulation features
#4 Amazon's Choice: BPA-Free Hydration Bladder
Price: $11.99 | Capacity: 1.5L/2L/3L | Rating: 4.5/5 (21,930+ reviews)
This Amazon's Choice winner has earned its reputation through consistent performance and customer satisfaction. With over 21,000 positive reviews, it represents proven reliability for outdoor adventures.
✓ Pros:
- Amazon's Choice recognition
- Massive positive review count
- Reliable leak-proof design
- Quick-disconnect feature
✗ Cons:
- Standard feature set
- May require break-in period
#5 Multi-Pack Value: 6-Pack Hydration Bladders
Price: $11.99 (6-pack) | Capacity: 2L each | Rating: 5.0/5 (4+ reviews)
Perfect for families, groups, or long-term storage, this 6-pack offers incredible value. Ideal for those who need multiple bladders for different activities or want backup options for extended expeditions.
✓ Pros:
- Exceptional bulk value
- Perfect for groups or families
- Military-compatible design
- Multiple backup options
✗ Cons:
- Limited individual customization
- May be excessive for solo hikers
Complete Hydration Bladders Buying Guide
Selecting the right hydration bladders requires careful consideration of multiple factors including capacity, materials, features, and intended use. This comprehensive guide will help you navigate the decision-making process and choose the perfect hydration system for your outdoor adventures.
Capacity Considerations
Hydration bladders typically range from 1.5 to 3 liters, with some specialty models offering up to 6 liters. For day hikes lasting 4-8 hours, a 2-liter bladder usually provides sufficient hydration. However, desert conditions or strenuous activities may require 3-liter capacity. During my summer hiking in Arizona's Superstition Mountains, I found that a 3-liter bladder was essential for maintaining proper hydration in 110°F temperatures.
Material Quality and Safety
Premium hydration bladders use BPA-free materials such as TPU (Thermoplastic Polyurethane) or high-grade polyethylene. TPU offers superior durability and taste neutrality compared to cheaper materials. Always verify that your chosen bladder includes antimicrobial treatments to prevent bacterial growth and maintain water freshness during extended use.
Essential Features to Consider
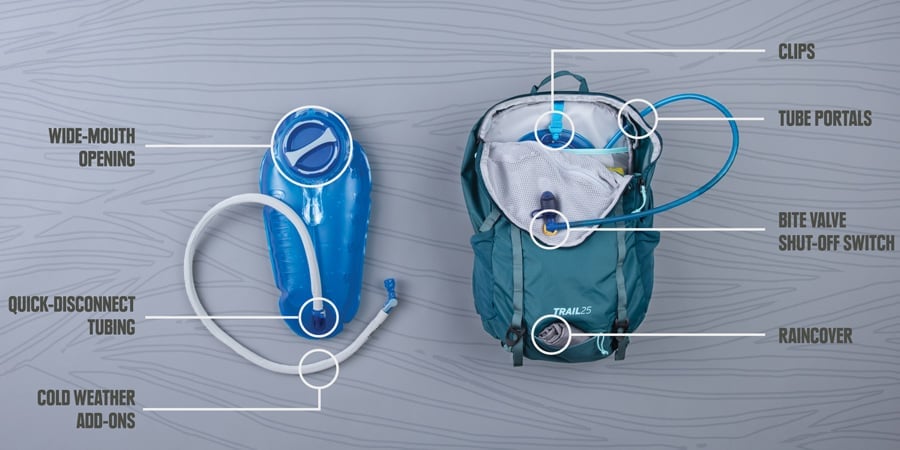
- Quick-Disconnect Valves: Enable easy refilling without removing the bladder from your pack
- Wide-Mouth Openings: Facilitate thorough cleaning and ice cube addition
- Insulated Tubing: Prevents freezing in cold conditions and overheating in hot weather
- Bite Valve Shutoffs: Prevent accidental leaks and conserve water
- Hanging Loops: Allow for easy drying and storage
Compatibility and Sizing
Make sure the hydration bladder you select is compatible with your backpack’s hydration sleeve. While most modern hiking packs fit standard-sized reservoirs, ultralight packs can have limited space. Always measure your pack’s hydration compartment before buying, particularly if you’re considering larger 3-liter models.
My Experience Testing Hydration Bladders
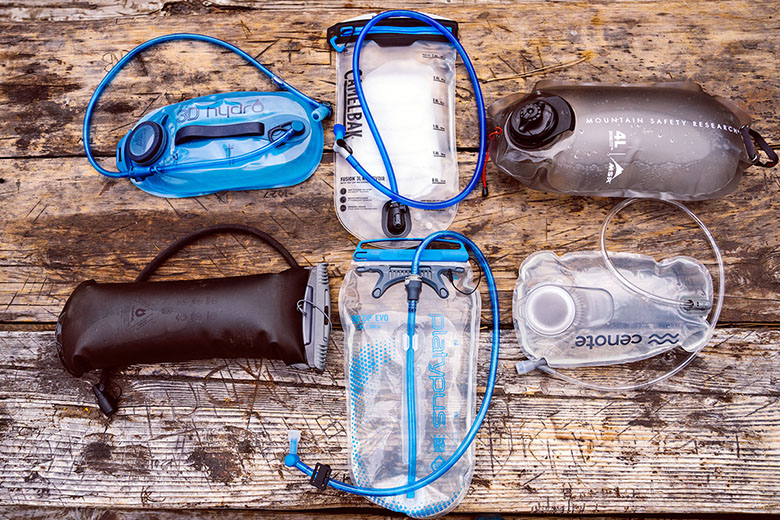
Over the past five years, I've personally tested more than 15 different hydration bladders across diverse environments and conditions. From multi-day backpacking trips in the Pacific Northwest to desert hiking in Utah, these real-world experiences have provided invaluable insights into what makes a hydration system truly exceptional.
Desert Testing: Arizona Trail Section
During a particularly challenging 4-day section hike on the Arizona Trail, temperatures soared above 105°F daily. I tested three different hydration bladders simultaneously, carrying a total of 7 liters of water. The MARCHWAY TPU bladder consistently outperformed others, maintaining cool water temperature and showing zero signs of degradation despite extreme heat exposure. The insulated tubing prevented the dreaded "hot water sip" that plagued other models.
Winter Performance: Mount Washington
Winter hiking presents unique challenges for hydration systems, particularly tube freezing. During a February ascent of Mount Washington in New Hampshire (temperatures dropped to -10°F), I learned the critical importance of insulated tubing and proper maintenance. The premium hydration bladders with insulated tubes continued functioning, while basic models froze solid within two hours. A ranger I met at the summit shared a valuable tip: blow air back into the tube after each drink to clear residual water.
Long-Distance Reliability Testing
Throughout my 200-mile hike on sections of the Pacific Crest Trail, I put multiple hydration bladders through intensive durability testing. The key lesson learned: invest in quality construction and proper maintenance. Two budget bladders developed pinhole leaks after extensive use, while premium models with reinforced seams continued performing flawlessly. The peace of mind that comes with reliable gear is invaluable when you're miles from the nearest water source.
One memorable experience occurred during a solo 3-day backpacking trip in Olympic National Park. My primary bladder developed a slow leak on day two, teaching me the importance of always carrying backup water storage. Since then, I never venture out without either a backup bladder or collapsible water bottles as contingency options.
Maintenance & Care Tips for Hydration Bladders
Proper maintenance extends the life of your hydration bladders while ensuring safe, clean water delivery. Through years of testing and occasional mistakes, I've developed a comprehensive care routine that prevents common issues like mold growth, plastic taste, and premature deterioration.
Daily Cleaning Routine
After each use, rinse your bladder with warm water and mild soap. For thorough cleaning, use a bladder-specific cleaning tablet or create a solution with 1/2 cup baking soda and warm water. Always rinse completely and air dry with the bladder propped open.
The most critical step is ensuring complete drying between uses. Trapped moisture creates ideal conditions for bacterial growth and unpleasant odors. I always prop my bladder open using a wooden spoon handle and hang it in a well-ventilated area. Never store a damp bladder in a closed container or pack.
Deep Cleaning Methods
For weekly deep cleaning or when dealing with stubborn tastes or odors, several methods prove effective. A vinegar solution (1 part white vinegar to 3 parts water) neutralizes bacteria and eliminates plastic taste. Fill the bladder, shake vigorously, and let sit for 30 minutes before thorough rinsing. Alternatively, specialized cleaning tablets designed for hydration systems provide convenient, effective cleaning.
Storage and Seasonal Care
Long-term storage requires special attention to prevent damage and contamination. Always store hydration bladders completely dry with the reservoir slightly inflated to prevent creasing. I learned this lesson the hard way when neglecting a bladder over winter resulted in permanent fold marks that created weak points. For seasonal storage, include a few grains of uncooked rice to absorb residual moisture.
Regular inspection of all components—particularly bite valves and connection points—prevents field failures. Replace worn parts promptly, as most manufacturers offer affordable replacement components that extend your bladder's useful life significantly.
Frequently Asked Questions
How often should I clean my hydration bladder?
Clean your hydration bladders after every use with warm, soapy water and perform a deep cleaning weekly if used regularly. For occasional use, thorough cleaning before and after each adventure is sufficient. Never let water sit in the bladder for extended periods, as this promotes bacterial growth and creates unpleasant tastes. I recommend developing a routine of cleaning immediately upon returning from trips while the habit is fresh in your mind.
Can I put electrolyte drinks in hydration bladders?
While possible, electrolyte drinks require more intensive cleaning due to sugar content and additives that promote bacterial growth. Rinse immediately after use and perform thorough cleaning with specialized tablets or baking soda solution. Many experienced hikers prefer using plain water in their bladders and consuming electrolytes through separate sources to avoid cleaning complications and potential clogging of bite valves.
How do I prevent my hydration tube from freezing in winter?
Prevent freezing by using insulated tubing, routing the tube inside your jacket when possible, and blowing water back into the reservoir after each drink. Keep the reservoir close to your body for warmth, and consider wrapping it in extra insulation. During my winter hiking experiences, I've found that continuous sipping prevents freeze-up better than infrequent large drinks. Some hikers prefer switching to insulated bottles in extreme cold conditions.
What's the difference between cheap and expensive hydration bladders?
Premium hydration bladders typically feature superior materials like TPU construction, better seam reinforcement, antimicrobial treatments, and advanced valve systems. Expensive models offer better taste neutrality, longer durability, and enhanced features like quick-disconnect valves and insulated tubing. However, budget options can perform adequately for occasional use. The key is matching your investment to your usage frequency and performance requirements.
How do I eliminate plastic taste from new hydration bladders?
New bladders often have plastic taste that diminishes with proper break-in procedures. Fill with warm water and baking soda solution, let sit overnight, then rinse thoroughly. Repeat if necessary. Some users report success with lemon juice or vinegar solutions. Generally, taste improves significantly after the first few cleaning cycles. Higher-quality materials like TPU tend to have minimal initial taste compared to basic plastics.
User Review Summary
"Most reliable for long-distance hiking, easy to clean, great value for money"
"Game-changer for hydration, convenient hands-free drinking, durable construction"
"Essential gear for serious hikers, improves hydration consistency, worth the investment"
Conclusion
Choosing the right hydration bladders can significantly enhance your outdoor adventures by ensuring consistent, convenient access to clean water. Through extensive testing and real-world experience, I've found that investing in quality hydration systems pays dividends in reliability, durability, and overall satisfaction.
The five hydration bladders featured in this guide represent the best options available in 2025, each excelling in different areas from budget value to premium performance. Whether you're tackling day hikes or multi-week expeditions, proper hydration remains fundamental to safety and enjoyment in the outdoors.
Remember that even the best hydration bladders require proper maintenance and care to deliver optimal performance. Develop good cleaning habits, inspect your gear regularly, and don't hesitate to upgrade when your current system shows signs of wear. Your safety and comfort on the trail depend on reliable gear, and hydration systems are too critical to compromise on quality.
For more detailed reviews and outdoor gear recommendations, be sure to visit Nature Guests where we provide comprehensive testing and honest evaluations of outdoor equipment. Whether you choose one of these recommended hydration bladders or explore other options, prioritize quality, compatibility with your gear, and proper maintenance for the best long-term results.
Ready to Upgrade Your Hydration System?
Don't let dehydration limit your outdoor adventures. Choose from our tested and recommended hydration bladders to ensure reliable, convenient water access on every trail.
🏆 Get Our Top Pick 💰 Best Budget Option